Firefox has a facility to use native file pickers via xdg-portals, which most of the internet will tell you is set in a key in about:config called widget.use-xdg-desktop-portal. Quite some time ago, that was split into more granular keys so … Continue reading →
There have been some intermittent issues with this site for the last few days because some shitheel has been hammering the server that hosts web-facing things for me with automated script-kiddy bullshit that my existing hardening didn’t automatically catch.
Roughly 10GB of it in the last week. With user agents set to around 500,000 different Chrome versions.
I noticed because the (small) box has been OOM killing processes any time the stats tools look at the logs of this behavior.
Most of it came from one address (in the AliCloud IP allocation, as always. I’ll continue to half-pretend it’s just a compromised VM) so I cleaned up the worst of it by adding an nftables rule to drop anything from that saddr, and did a little filtering to the logs to fix the OOM situation.
I’ve also turned on some rate-limiting features in nginx, and rigged fail2ban to block repeated violators of the rate limit, so hopefully things are more permanently taken care of.
I was having Vulkan/Wine interaction issues when I had a minute to play a game the other night and flipped my big laptop (which has Intel/AMD Polaris12 dual graphics, both running the Mesa stack since AMD dropped Polaris support in amdvlk in the 2023.Q4 release) into a Plasma Wayland session (v5.27) to see if it helped. It did – making it the very first thing I’ve encountered that worked in Wayland and not X – so I’m rolling with the Plasma Wayland session for a couple days to see how things are. I have a little machine I’ve been playing with Hyprland on to check out the Wayland situation, and it’s been closing from “Linux 20 years ago” to “Linux 5 years ago” in terms of brokenness, so it seems plausible that one of the big two would be tolerable now.
I’m totally onboard that xf86->xorg is an unmaintainable mess for both legacy-codebase and design from a different era reasons, and it would be nice to start with something built on assumptions that match modern reality, but uh… over a decade in, Wayland is just getting to be less of a “almost a tech demo” and more of an “almost there.” If the devs can shut up about some bikeshedding that obstructs common use cases now over concerns about theoretical security issues or compatibility with yet-unimagined future interface models and implement widely-accepted solutions to the last few basic-fucking-features, it might actually matter before it too starts to exhibit wrong ancient assumptions and gets replaced, but it looks like they’ve missed the bus on a couple of those necessary standardizations.
Things I use regularly that are currently broken in KDE’s Plasma Wayland session in Nov. 2023:
The mere fact that I have to specify it’s a KDE Plasma session for all these details because every compositor is having to reinvent a bunch of wheels in differently-broken ways – input plumbing, session management, etc. They could have at least spun some reference libraries and treated anyone who didn’t use them when building desktop-like interfaces as a second class citizen to paper over the necessary parts to build a desktop they didn’t want in the core protocol (and for some of them someone else did it; see PipeWire). Wayland’s entire development process is built around former X devs being exceptionally gunshy about maintenance and attempting to avoid having any meaningful implementation under their auspices, and it’s causing a lot of goofy decisions. wlroots was too little too late.
KeepassXC can’t do its autotype into last active window thing.
Because Wayland completely abdicated on input plumbing and programmatic window selection. It even sort-of works between xwayland windows because X is a feature-complete desktop protocol and Wayland isn’t.
I use this ALL THE TIME and it drives me CRAZY. Browser extensions are not a comparable solution, I auto-type credentials into all kinds of windows.
They finally accepted ext-foreign-toplevel-list so the plumbing for window selection is theoretically there… but I don’t think any compositors implement it yet.
The pipe-input-to-a-specifc-window shit is still being bikeshedded over mostly-irrelevant security concerns. Maybe maybe the ever-contended global hotkeys stuff in xdg-destop-portal will make it possible, but since every compositor has sprung a bespoke portal variant, even that may not comprise a global solution, and it’s not entirely clear it’ll work for piping arbitrary strings anyway.
Everything restores to a random virtual desktop, if it restores at all.
Ed: …and sometimes it now not only works but shows the control I was having trouble with in the next point when right clicked.
The “Move to Screen” context menu item in the task switcher seems to have vanished? I can still do “Move” and scoot a program to the desired monitor and it seems to snap correctly, but sometimes fullscreen windows relocated that way jump back to the first display. Apparently it has never been available from the task manager, only the title bar right-click menu and my memory is faulty.
I don’t know if it’s Wayland related, but baloo has started acting up again. I’m regularly seeing baloo_file_extractor eating a whole core when it hits things like openembedded trees. It’s possible I just disabled it in my saved X session and it’s being started again because the session management carryover between X and Wayland Plasma sessions is half-working.
The whole situation is silly. It’s a gigantic shell-game of trying to outsource the solutions to problems everyone already knew needed to be solved consistently because the ICCM and EWMH stuff for X represented decades of effort to do so, by the people best situated to actually solve the problems at the time when they could be solved in a general way.
I sometimes get the feeling reading the bug trackers that many of the Wayland people are building a display layer suitable for infotainment systems, kiosks, signage, and that sort of thing, and desktop functionality is an unfortunate extra thing some people are trying to force on them – which, financially, may be the case.
Look at this time crystal on shopgoodwill. A pristine Antec SX1030 case (or chieftech dragon or one of the other clones), painted metallic green with a window installed. Every commercial or DIY gaming PC in the first few years of … Continue reading →
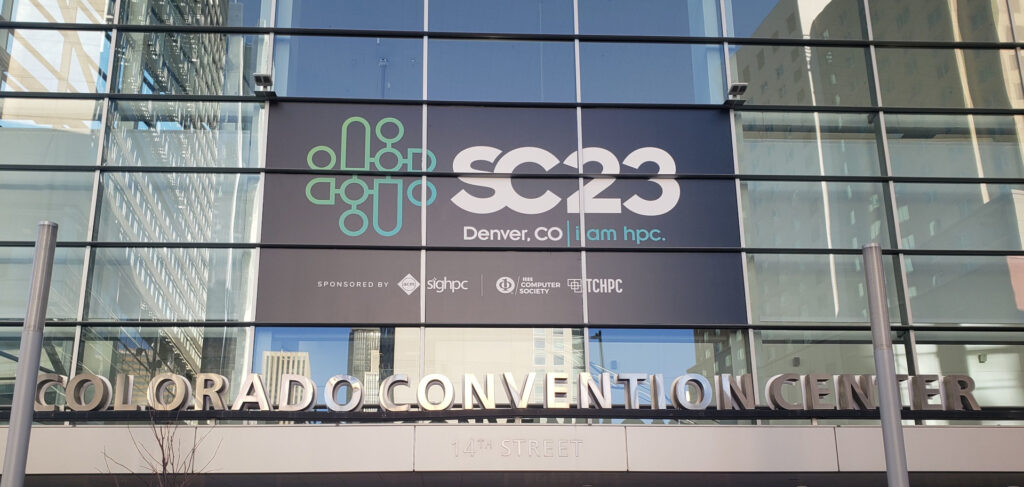
I got talked into going to SC again this year, as I have almost every year since 2009. It’s not really my area of focus, but it’s always interesting.
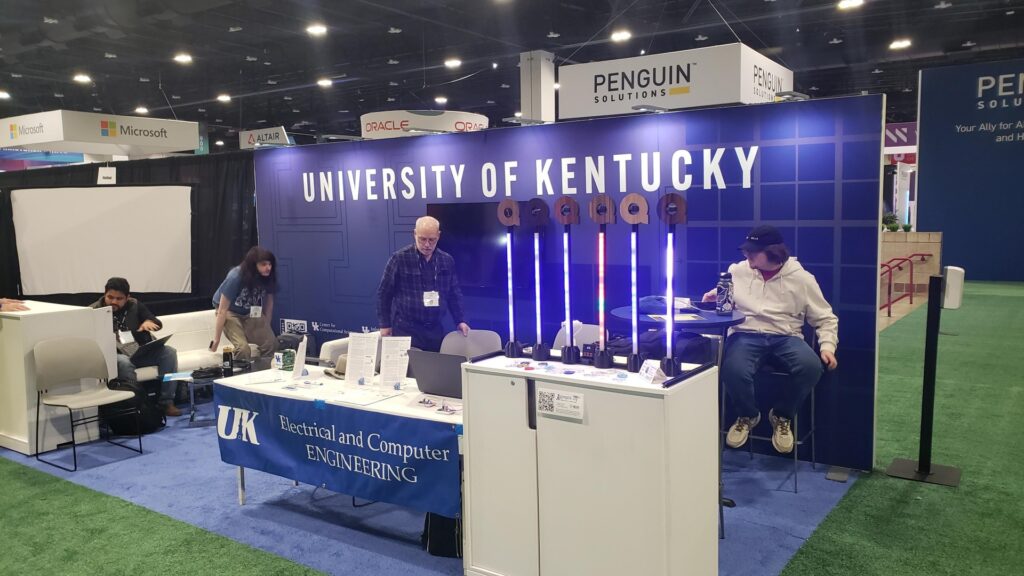
UK’s presence featured a mixture of IT/CCS types and researchers, the research end of the booth was mostly focused on ongoing Parallel Bit Pattern Computing work, featuring a new demo/visualization thing that I built much of the hardware and some of the software for in the 3 weeks before we left for the conference (the rest came from Hank modelling some printable parts, pulling the compute engine from an older demo he wrote, and building some adapter code). It was more exhausting than the conference itself, but a really fun prototyping/micomanufacturing flex. Fancy 3D printed parts, 2020 extrusion, some laser cut bits, piles of addressable LEDs, a bit of embedded electronics. There is also a partially-functional prototype backplane to link 4 EBAZ425 FPGA boards through an Aggregate Function Network as a PBP substrate that …I designed. There’s a lot of not-my-job work I did on display; I should probably start throwing more of a fit about that.
Some notes about the stuff we were showing and interesting(?) industry observations below.
Input conditioning is one of those things that snares novice designers, causes late-process changes that overrun expectations on cost and board area, and traditionally isn’t terribly well taught to EE/CPE students.
It’s on my mind because next week is the point in the semester where I drag UK’s current crop of EE/CPE sophomores through a lab exercise I designed about 5 years ago to drive home gate delays, static hazards, switch bounce, etc.
While I was thinking about it, an upperclassman who regularly digs up neat stuff sent me the cleverest input conditioning circuit I’ve ever encountered.
The circuit comes from the late, great Don Lancaster of TV Typewriter fame, who in addition to his published designs, wrote and self-published a number of instructional/reference books. He had a well-deserved reputation for clever, cheap, robust circuit designs, and this particular trick is the highest wizardry.
Here’s the whole circuit diagram from the text:
The design comes from his CMOS Cookbook (PDF, link to his own hosted copy of the 2nd ED), on p.317 amid a discussion of Flip-Flops and Clocks. It is presented as “An Alternate-Action Push Button” which is entirely correct but really undersells how clever it is, and has apparently been in there since the 1st edition in 1977.
The fundamental trick is that it’s a master-slave Flip-Flop where the capacitor is the master storage element, and the pair of feedback-coupled inverters is the slave. The cap tanks the next state based on the output of the first inverter when the switch is open, and induces it on the inverters on switch close. This means, in addition to latching/toggling, it de-bounces, because the capacitor sets the time constant for hysteresis. It conditions, because the load sees the output of the second inverter. No race conditions or potential oscillations, because the cap can’t charge/discharge while the switch is held. No charge is moving inside the mechanism at steady state, so it’s not leaking power. It’s brilliant.
It is only suitable for relatively slow human-scale edges, so probably not a good method for encoders or the like. You can manipulate the time constant for the de-bounce by changing the value of the capacitor, but only down to a few 10s of nF (depending on what kind of inverter you use) before it gets marginal because it doesn’t have the charge to reliably throw the input of the first inverter.
Not only is it ridiculously cheap and simple as presented, which I think intends a 4067 or 74HC04, you can built it out of anything. Any inverting CMOS gate will work. Any inverting TTL gate will work. Ridiculous old RTL or DTL inverters work. A pair of N-Channel FETs (another CircuitJS link, has an extra transistor on the output for integrity reasons) with pullups to build your own cruddy NMOS inverters works. As would P-channels with pull-downs, or BJTs with resistors for constructed RTL (though doing it that way is leaky), or various other assemblages of tiny mass produced minimum cost components to make it even more minimal (though maybe not cheaper in a modern context).
I appreciate a clever domain-crossing design, and this is the highest form.
I had nothing to do with this but I’m super excited. There has been a long-standing bug in the CPU emulation in Basilisk II (a 68K Macintosh emulator) that could be reliably triggered when *inhales* Bruno the shark killed you … Continue reading →
Several years ago I picked up a used Dell Chromebook 11 3189 (model code “Kefka”) to play with. At the time it was still receiving ChromeOS updates, had a sticky hinge that required some lubrication and manipulation to get working, and cost around $100 including the separately purchased power adapter. I’ve hacked on it in a wide variety of ways over the years, and the main interesting result is that I’m starting to think a hacked out-of-support x86 Chromebook is, in many ways, now better and cheaper than a Raspberry Pi in that role as a modern accessible extra computer to enable fearless play the Pi was intended to fill. I’ve been taking notes, so way too much detail below.
Every now and then I like to post one of these, just to show process I currently use. The magic of 3D printing is that once you’re set up this kind of quick job comes up all the time.
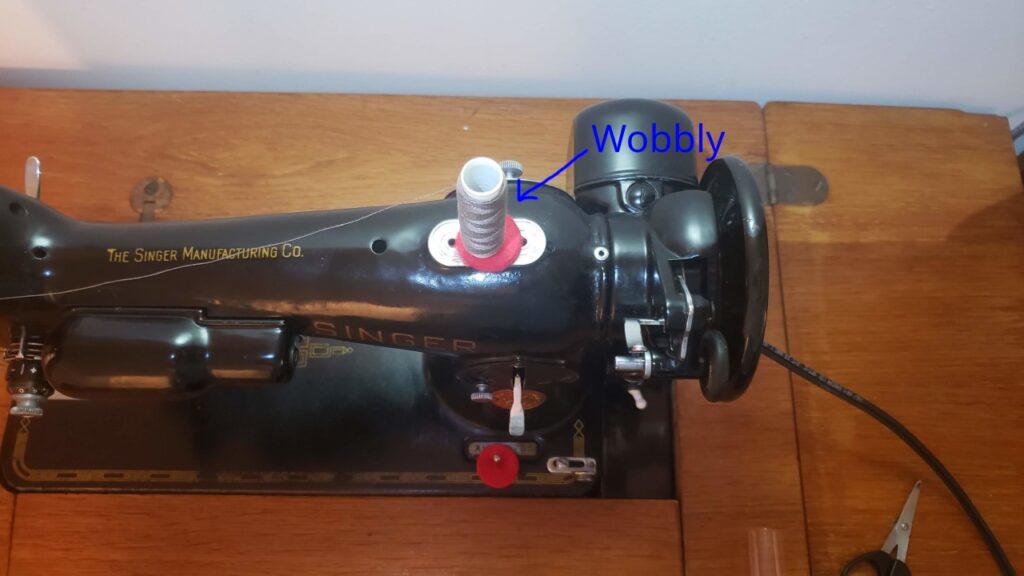
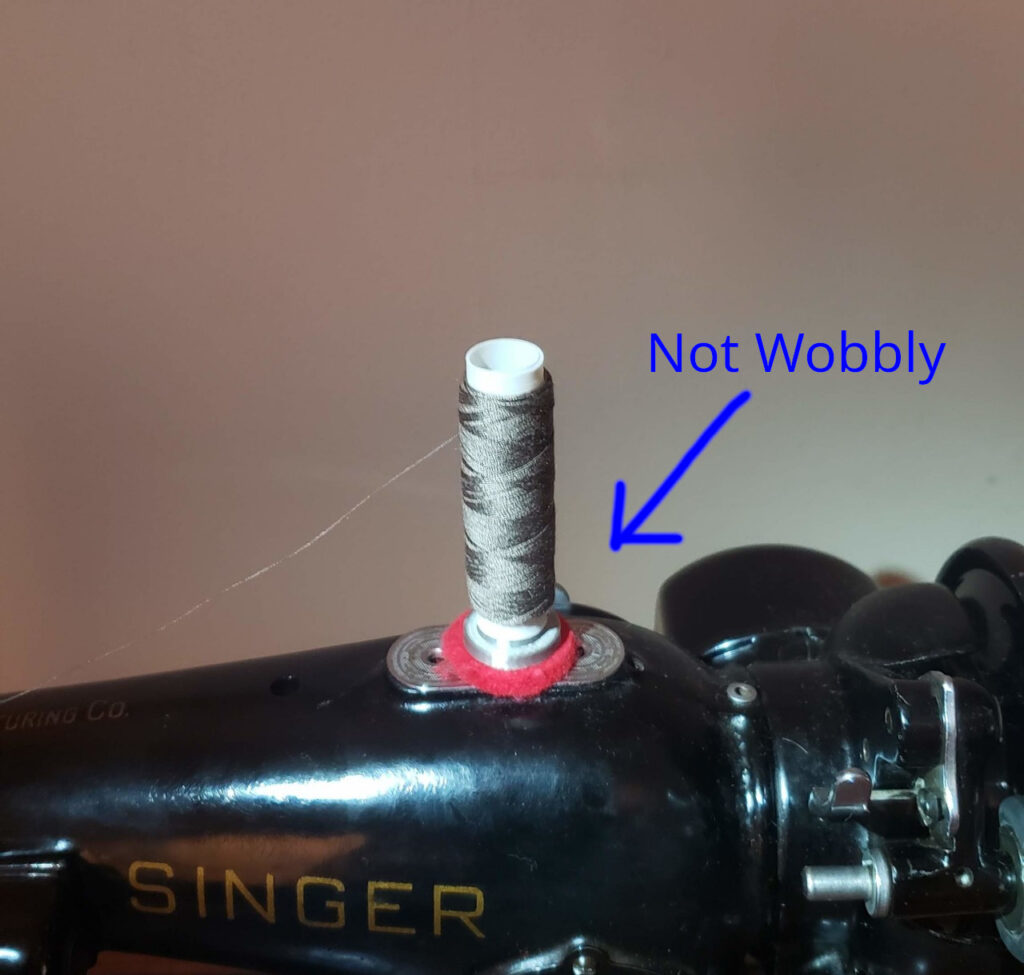
I have this cheap thread assortment that came on tubes rather than spools. It’s surprisingly decent thread, has good coverage for finding suitable colors for any project… and the 13mm ID tubes wobble badly on standard 4.5x40mm spool pins on sewing machines, especially when filling bobbins.
I was doing a little (ham fisted) machine sewing this weekend and it was irritating me …so I fixed it.
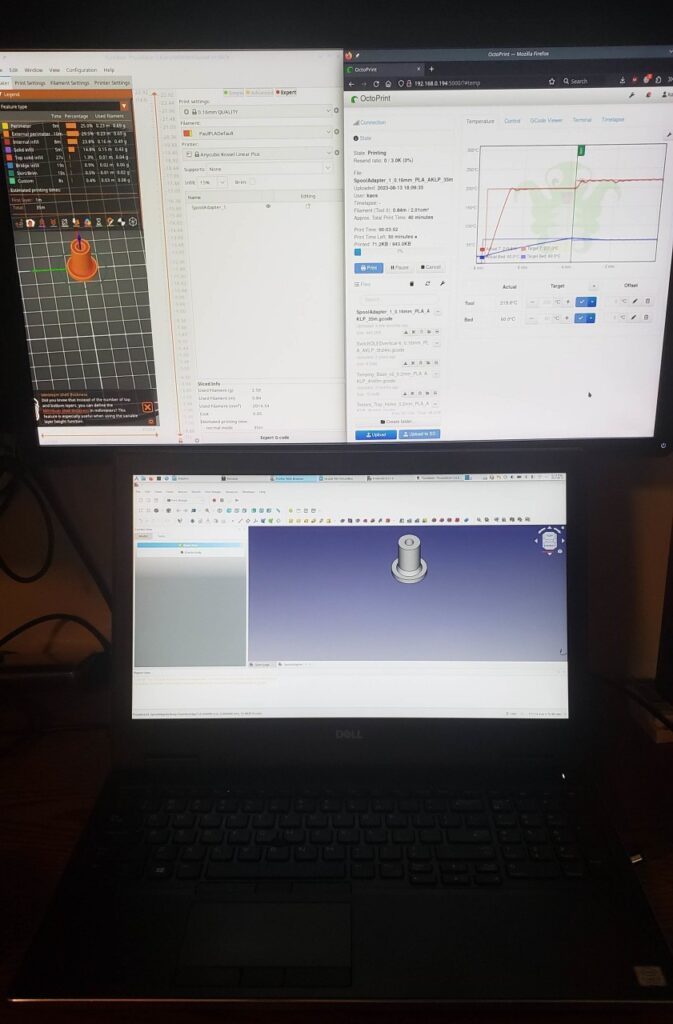
The tube wobbles badly on spool pins, especially when winding a bobbin.A couple quick measurements.A pass through the CAD/CAM processPrinting the part. Silver “Silk” PLA because it was loaded from the previous task. Fits well enough on the first try.
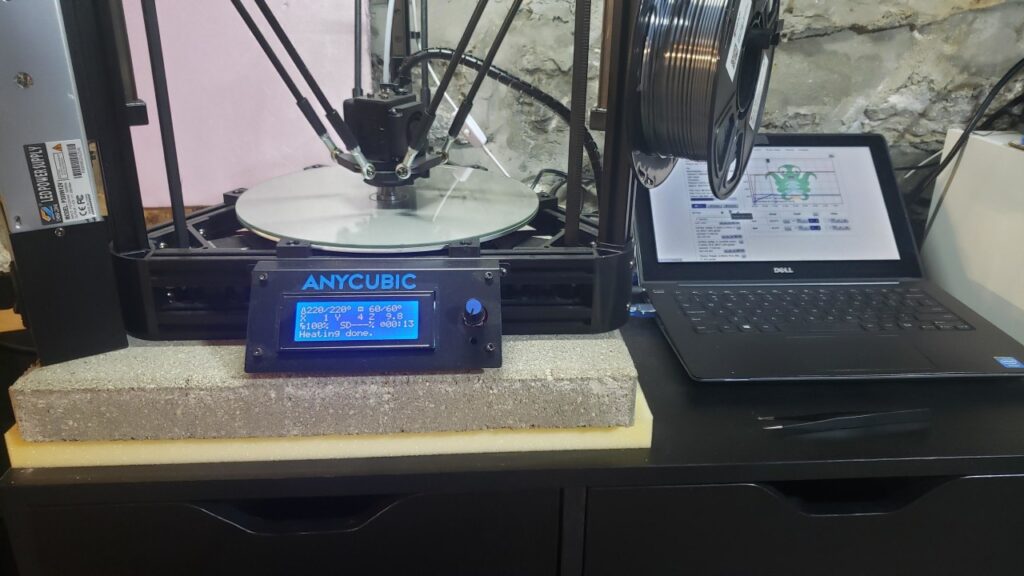
I’m finally getting less-incompetent with FreeCAD. Straight to “Part Design” workbench, sketch only one extruded pads’ features at a time, then decorate in any chamfers etc. at the interfaces. Import into PrusaSlicer with some sane defaults, send to the Anycubic Linear Kossel in the basement via OctoPrint (No, I don’t do it blind, I send and load the file, then go down to keep an eye on the startup sequence and make sure the filament hasn’t cracked and such), receive part.
Fit is intentionally a bit loose on all dimensions, nothing this part interacts with is consistent or close-tolerance, everything should move if it wants to, and the chamfer gets the tube seated well enough to not flop about.
FCStd and 3mf if anyone else happens to have this exact problem, which seems likely because similar thread assortments seem to be pretty ubiquitous on the usual eCommerce sites.
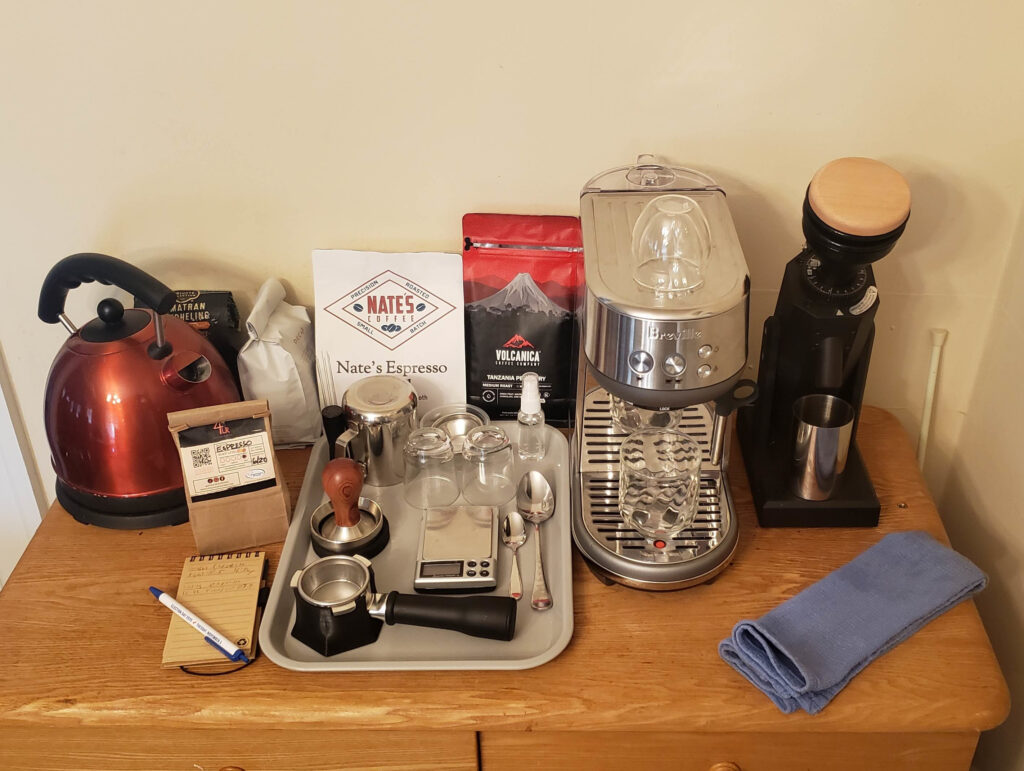
Back in early 2010 I posted about my home espresso setup at the time. I recently (finally) replaced it, and I have thoughts. Obnoxious, obsessive, thoughts.
The TL;DR is that I bought a Breville Bambino espresso machine and a Turin SK40 grinder, the former is good, the latter is really good, but there is plenty of rambling and pictures and such below the fold.