Category Archives: DIY

MPW Environment

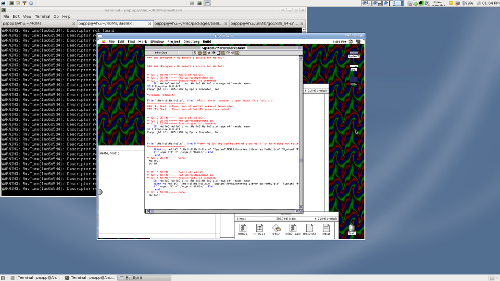
I just set up a BasiliskII disc image with System 7.5.3, MPW, and related goodies. It seemed like fun to have a vintage 68k Mac development environment to play in…
sys7mpw_desktop.png

Posted in Computers, DIY, General, OldBlog | Tagged , , | Leave a comment

T60p Repair

I opened up my old T60p for some repairs the other night, just posting to share what I did now that I’m reasonably certain it worked. The objective of this project was to do something about the relatively high temperatures and annoying buzzing noise coming from the cooling system. This particular machine is on it’s third cooling assembly (the assembly was replaced twice under warranty), and based on comments on from other owners, thermal issues and rattling fans are endemic to the model, mostly thanks to a few poor design decisions.
The surgery:

  • * Oiled (I used BSB Speed Bearings Lube, which is probably Sililcone oil with some adulterants to make it Shear thinning) the fan assembly, basically following msb0b’s guide. The only major deviation is that instead of cutting the aluminized tape, I just used it as a hinge and folded back the jacket. I also note that there is some foam insulation tape on my heatsink assemby, presumably added in later manufactured asssemblies to help with vibrations.
  • * Bent (compound bend) the heatpipe to lower the GPU section about 2mm, as some of the folks in this thread suggest. Basically, I put some thermal paste on the GPU, and bent and reseated until the contact area was appropriate. I was a little afraid bending the heatpipe would harm it (efficiency wise), or crack it from metal fatigue, but nothing was damaged and the contact is better. This is a logical fix- those thermal pads never provide very good conductivity, particularly where they are reasonably thick.
  • * Replaced the CPU thermal compound and GPU thermal pad with Arctic Silver Ceramique (my favorite for almost all thermal-conductivity needs). I left the thermal pad on the north-bridge intact, as there don’t seem to be any major thermal issues with that component, and the pad over it wasn’t damaged.

Based on some cursory tests, the system is running cooler (Both overall and CPU-GPU delta) than it did even with a new cooling assembly. Idle, I’m seeing 43/41c (5-10 degree reduction), and a half-assed “Stress Test” running SupCom for a few minutes only produced temps in the low 80s, with the GPU about 5deg hotter than the CPU– my recollection is that the GPU tended to be in the high 90s under similar conditions, and the CPU in the mid 80s. The big win is on noise; the irritating rattle is gone, and the fan is at most a tiny bit louder than a new one, based on a procedure I should be able to replicate for free.

The wonderful thing about Thinkpads is that they are designed to be mostly user-serviceable (Lenovo cooperatively provides the service manuals as PDFs online, and even allows FRU orders), and they are very common machines, so there are lots of other people playing with them and sharing their experiences, making things like Linux support and after-market mods particularly well explored and documented. Even with the slight design issue, the T60p was a solid machine for 3.5 years, and I far prefer serviceable and working well to being unserviceable and being “slicker… until it dies”. Speaking of vendors of unserviceable hardware, I’m considering setting it up as a hackintosh (at least on one partition) just for fun when I get some time…

Posted in Computers, DIY, General, Objects, OldBlog | Tagged , | Leave a comment

HPDL Displays

I was fiddling with an old Logical PROMPRO-8 PROM programmer in the lab I teach in while waiting for one of the students to do something which required intervention, and noticed it had some really neat old character displays on it:
hpdl_sm.jpg
They are absolutely fucking captivating looking in person, in that “It isn’t clear what kind of light this is” sort of way, especially with the red filter lifted off so the dies are visible under the lenses. I was interested enough to closely investigate and make the unit go through some of it’s functions just to figure out what the displays are capible of, then asked the great google god to identify the design. I’m reasonably certian they are Hewlett-Packard HPDL HP-2416 displays (or one of their siblings), which are among the earliest single-die segmented LED displays, before the familiar (7- 14- or 16-) block arrangements became standard. Each package has four tiny 17 segment digits under individual epoxy bubble lenses, and an internal ASCII decoder, character generator, and memory, which should make them really fun and easy to interface. It looks like the division of HP that made the parts went to Aglilent when HP dismembered iteslf, and then was spun off as Avago with most of the other semiconductor buisness in 2005, although Litronix may have been making clones/second-source compatible parts in the 1970s as well.
…I sort of want to find some (which would mean NOS or pulls) to build a funky clock or RSS gadget or other useless status display, just to marvel at them. Sadly, it looks like that would be prohibitively expensive, as the later production drop in compatibles are “boring” 5×7 grids with similar capibilities, making originals exotic enough to be on the order of $20 a piece.

Posted in DIY, OldBlog | Leave a comment

Summer Projects

I haven’t been posting much lately, most of my time has been sucked up by a variety of summer projects, both personal and school related, and most of them haven’t been terribly externally interesting or photogenic.

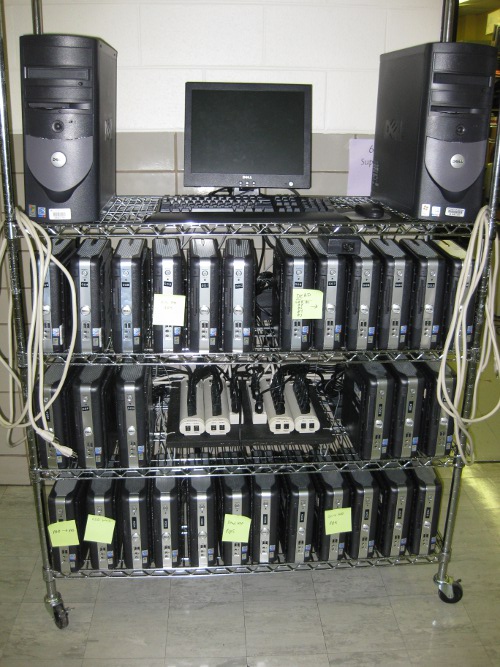
Several of the projects derive from the research group inheriting a heap of hardware from the departure of the last member of UK’s Cluster Fluid Dynamics group, which we are currently in the process of sorting out. One part of the heap is 30 little Dell SX260s (cute li’l SFF Pentium 4 boxes from 2003 or so), and some associated server and network hardware. I’ve spent a couple afternoons building and configuring a portable (ish) cluster from the pile, and the result is PIK (Pentium/Intel Cluster in Kentucky, following our current naming scheme):
pikfront_sm.jpg
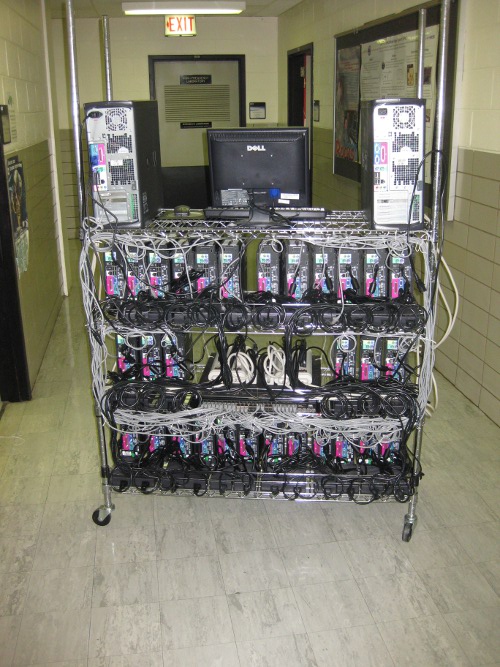
And check out my OCD wiring job:
pikback_sm.jpg
Unfortunately, six of the small nodes and one of the servers seem to be dead, all apparently due to bad capacitors… which is sadly entirely unsurprising on for hardware from around 2003. There is still a discussion if it would be worthwhile to replace the caps, it is apparently not too difficult on these motherboards.

On another front, I still haven’t managed to get my 500-some photos from Vienna sorted out; I think only a few of those will end up getting posted as they relate to other things — the urge to just shoot with a little digital and a large memory card creates a really unmanageable number of photos.

Posted in Computers, DIY, General, Objects, OldBlog, School | Leave a comment

Drive Nuts

Another bit of progress on the CNC project: Better drive nuts!

The design is attempting to avoid expensive, difficult-to-source, or chicken-and-egg problem machined parts. The biggest issues because of that policy come from the couplers which attach the lead screws to the motors, and the drive nuts which attach the axes to the lead screw. Because my leadscrews are 3/8-16 Unified Coarse thread, there isn’t a “proper” solution to the problem, as any professional mill would be using Acme or Ball threads for the leadscrews. Therefore it has been hobby engineering all the way on those parts.

The current couplers (with which I am becoming ever more unsatisfied; they slip badly on direction reversals) are constructed by seizing a 3/8” coupling nut onto the end of the rod, drilling a 1/4” hole through the rod/nut assembly, and drilling and tapping a hole for a set screw into the side of the nut to grab the flat of the motor shaft. Because the frame won’t accommodate Lovejoy-type couplers (the canonical solution for such things), I suspect the eventual replacements may look something like the nested fuel line couplers this and other similar designs employ. I don’t like the lack of stiffness in those configurations, but things don’t appear to be tightly enough aligned for the inflexible couplers, and the slippage problem will be a show-stopper for actually milling with it.

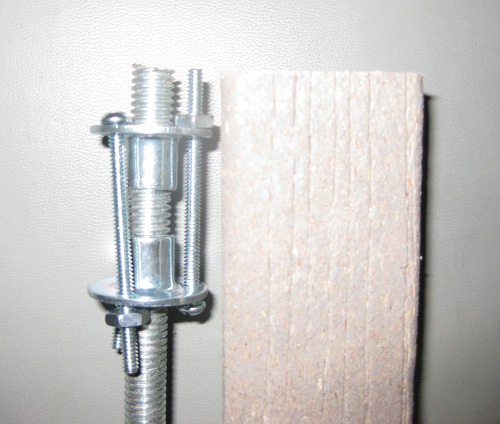
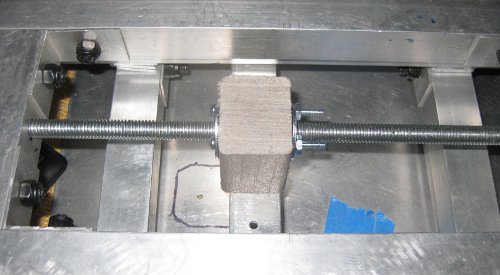
The old solution for the drive nuts was roughly-bent steel brackets, wrapped around coupling nuts. The theory was that the steel would be springy enough to pull things into alignment, and malliable enough to beat, bend, twist, or otherwise adjust the fit. In actual fact, no amount of adjustment could get them to align perfectly, and the springiness wasn’t enough to prevent them from contributing to the axes walking in their rails. That design was eventually abandoned, and no good alternative came to mind, so one of my collaborators and I performed one of the best techniques for mechanical problem solving; we wandered around a home improvement store until we found parts to make something that would work. The solution? — Pairs of Tee nuts (the kind with screw holes, not tacks), attached together with machine screws (adjusting the tightness of the screws controls the preload, which gives free anti-backlash effects), mounted in blocks of Trex (A plastic/wood fiber composite material), which is cheap, easy to obtain, and works similarly to HDPE (Which is to say, wonderfully. Think soft, forgiving wood with no grain). These seem to be better than the old ones, and (possibly with a bit of shimming) workable for a usable mill.

Check out deez nutz:
Rough-fit Outside the block (that is a bar of Trex stock next to it):
drivenutopen_sm.jpg
and one nut complete and sitting in place:
drivenutcomplete_sm.jpg
There is a fair amount of fiddly fitting and drilling to putting those together, but nothing too awful. The machine screws have been trimmed and the edges of the block dressed a bit with a file after the other one went together, so they look pretty solid. In addition to better nuts, the other good discovery is that I suspect that Trex will make excellent, low cost, easily available material to mill objects without any particular material constraints from once the machine is working, I just wish it didn’t have tacky looking faux-woodgrain molded into the stock.

Posted in DIY, General, Objects, OldBlog | Tagged , | 1 Comment

Cherry Jam

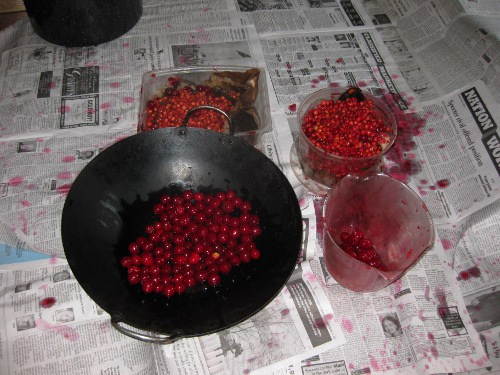
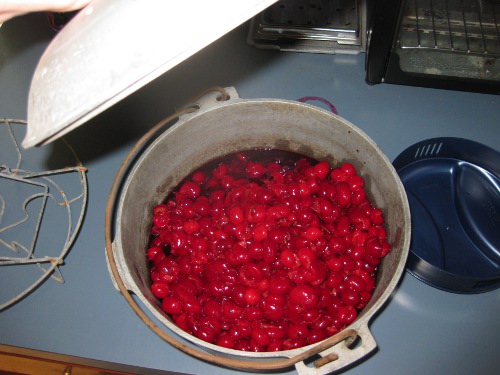
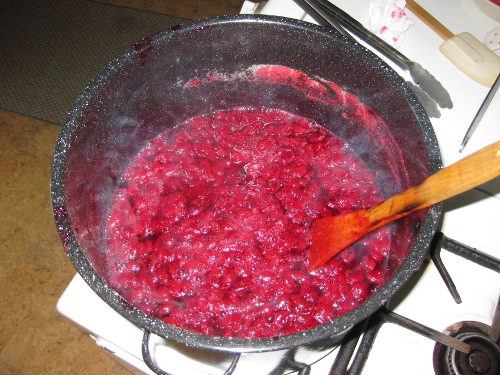
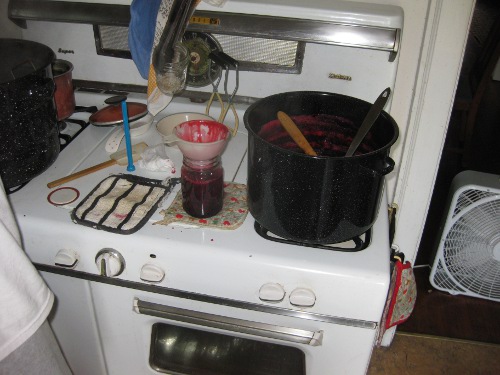
One of the better parts of having old DIY-ful hippie types for parents is getting do nifty things that people just don’t do anymore. One of the better examples is the yearly ritual of making jam from the North Star Cherry tree in my parent’s front yard. The tree was productive this year (and not so much last year) so we ended up making somewhere around four gallons of the stuff over two days last weekend.

Onward, to Jam Making pictures:
Pitting cherries, which is hand-staining and labor intensive:
pitting_sm.jpg
To make double-batch sized vats of cherries:
cherry_sm.jpg
Which get cooked down, sweetened, and thickened to make jam:
jam_sm.jpg
Which is then put into bottles:
jambottle_sm.jpg

Way better than the store bought stuff, and fun (if hot, tiring, and messy) to boot.

Posted in DIY, FoodBlogging, OldBlog | Leave a comment

DIY Molex Y-Cable

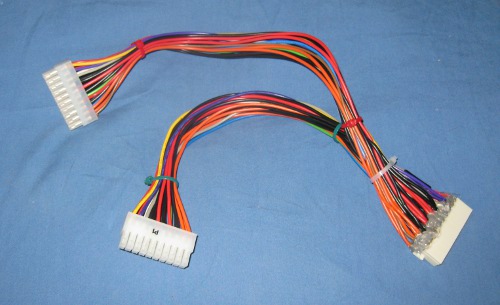
diymolex_sm.jpg
I think this thing might hold the record for the most times I used the phrase “Don’t do this” in a single fabrication.
It’s a 20-pin ATX Y-cable (for running two motherboards off a single power supply), built from two dead power supplies and a dead motherboard. The cables are available commercially, and if it works out will be ordered in bulk, but the research group needed a quick test cable, and all the necessary components were just sitting there in the dead parts pile…
The plan for these is to double up old Athlon (Thunderbred and Barton) machines on single power supplies, to reduce the number of power supplies (and total power budget. Related facts: 1. Switch mode power supplies are way more efficient when heavily loaded. 2. Power supplies and fans are by far the most fragile parts on disc-less machines) on a 128 node cluster built from scraps from KASY0 and some machines we recently inherited from the Computational Fluid Dynamics group in Mechanical Engineering. This cluster will be for testing network topologies (particularly Fractional Flat Neighborhood Networks), so the important thing is that it have lots of independent nodes, and not much else.

Posted in Computers, DIY, Objects, OldBlog, School | Leave a comment

User Time Logged In

A lab I sometimes do computer work for asked for a mechanism to account how long each user spends logged in on some *nix (Linux and ancient Solaris) boxes. I don’t know of a “proper” solution, so I did things the UNIX way: I wrote a stupid little awk script that parses the output of last -R to get a minute total. This isn’t a terribly clean or safe script, but it does “just enough” input sanitizing, and seems to work. Some (Linux) boxes I have access to appear to clear/archive/rotate wtmp on boot, so it doesn’t help on those.
Does anyone know of a better way to do this? Is there some utility I’m forgetting? Is this script dangerous in some way I’m not thinking of? Script follows:

#!/bin/sh
last -R | 
awk '
{
	user=$1;
	uselength=$9;
	
#	Check line format
	if (NF != 9) {
	print "Line " NR " discarded, " NF " entries. (Reboot messages, etc.)"
	}
	else if( $NF == "in"){
	print "Line " NR " discarded, still logged in."
	}
	else{
	
	logins[user]++;
# These times are (Days+Hours:Minutes)
	parsedtime=0;
	gsub("[()]","",uselength);
	split(uselength, sptime, "[+:]");
	parsedtime+=sptime[1]*24*60;
	parsedtime+=sptime[2]*60;
	parsedtime+=sptime[3];
	logintime[user]+=parsedtime;
	}
}
	
END {
	for (i in logins) {
		print i " Logged in " logins[i] " times, for a total of " logintime[i] " minutes";
	}
}'
Posted in Computers, DIY, General, OldBlog | Leave a comment

The Ugliest Little RepRap Stepper Driver

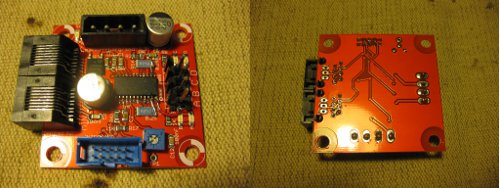
I’ve been playing with my CNC Mill project a little bit in some “spare” time(= time I should be working on things for school, but can’t focus), and just got my third RepRap Stepper Motor Driver v2.3 working after some replacement parts and judicious green-wiring.

I bought three drivers as kits, because they were cheap and well regarded, but the boards are largely surface-mount, and the first attempt to populate them didn’t go well, thanks to distorted lead frames and UK’s shifty surface mount equipment. With a little bit of hand soldering to fix lifted pads, I got two of the three boards going, but one of them …ignited… when tested because of a lifted ground on the main IC. The bad board has been sitting in it’s bag waiting for me to do something about it for most of a year now, and the other night I realized I could probably remove the chip, order a replacement Allegro A3982 from one of the electronics suppliers for a couple dollars, and try again. Pulling the chip by hand lifted four pads, but left it looking workable, so I picked up a pair of spare chips from DigiKey (who, for a pleasant but startling change, only charged me a very modest shipping fee).

My replacements arrived earlier today, and I couldn’t resist taking a crack at it. As the title suggests, this resulted in a UGLY but working driver board (click for larger):
redwire_sm.jpg
Check out the run of magnet wire across the bottom of the board, up through a via, and then under the pad it goes to. That is some quality fabrication (also, I checked, that path never carries much current, so magnet wire is OK). The other fixes are all relatively easy (and large-current) runs across one side of the board.

This time, instead of catching fire and destroying an IDC cable, connecting power and my supremely ghetto-rigged test circuit (a 555 timer set up to generate a pulse train on step, and some buttons and switches to control direction and enable) resulted in a smoothly turning motor. Success. I’ll probably only have to make one more small electronics order (remember that melted IDC cable…) and all the drive electronics will be together to run it from a EMC2/Linux box.

The hangup now is the connections between the axes and the drive nuts: my old bent-steel-sheet brackets were not square enough, and were causing walking and uneven tension and all manner of badness, but I haven’t managed to design a replacement I’m both satisfied with and able to build/source. If anyone has an idea for mounting a 1.25” long, .56” flat-to-flat hexagonal coupling nut to a metal panel 1” away from the rod the nut rides on, which will take large lateral torque and remain square to the rod, let me know. I have a half-baked plan with some modified heavy L-brackets, but there must be something better.

Posted in DIY, Electronics, General, Objects, OldBlog | Tagged , | 1 Comment

NAK Build Party

buildnak.png
My research group will be building our new (smallish) research supercomputer NAK:(NVIDIA Athlon XP cluster in Kentucky) on Friday, April 16, 2010 from 10A to 4P in FPAT672. UK students and other interested Lexingtonians are invited to come help with the build, so if you would like to play with the guts of a big cluster, you will be welcome at the (re)Build Party.

If you can come up with a better phrase (with a better acronym) for the “NoBuPAG” principle discussed in the machine description, that will be really welcome too.

NAK will provide a testbed for continuing research into building tools for performing useful compute work on GPUs. It presents a different model than the conventional GPU as an attached co-processor to powerful compute nodes model, which has thus far proven impractical to program for. Instead, NAK treats the nodes as “Nothing But Power And Ground” (and a network interface…), and will be running all of the heavy compute on the GPUs themselves, through a mechanism extended from our MOG project.

Posted in Announcements, Computers, DIY, General, Objects, OldBlog, School | Leave a comment